Recently I posted an article on how to Apply SSL Certificates to a Citrix Netscaler where the Netscaler is running the 9.3 firmware. While the process is very similar there are some differences in the 10.1 version. This time around we will review how to apply SSL Certificates to a Citrix Netscaler running firmware version 10.1 and assumes that SHA1 Wildcard Certificates with multiple SAN names are being used. The type of certificate type can be determined by working with your 3rd party certificate vendor. In this case example, Digicert was used.
Generate an RSA Key
- Sign in to your Netscaler
- Expand Traffic Management and then SSL on the left
3. Click Create RSA Key under “SSL Keys”
4. Fill in a Key File Name and make a note of this name
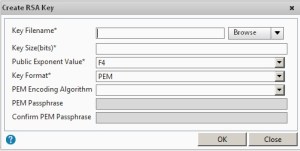
5. Key Size 2048
6. Select the options as shown in the screen shot above
7. Enter a password and make a note of this as well
8. Click Create
Generate a CSR
Citrix recommends that the CSR for multi SAN certs be generated through the CLI (command line interface such as Putty. See CTX135602 to complete these steps and skip the article instructions for “Generate a CSR”. I have found that this doesn’t always work, so in this case use the steps I provide in this article to generate your CSR.
1. Login to your Netscaler
2. Expand Traffic Management and then click SSL
3. Under SSL Certificates click on “Create CSR (Certificate Signing Request)”
4. Provide your request file name
5. Then browse to the RSA key in the “Key File Name” section
6. Choose PEM key format
7. Fill in Common name for the certificate, City, Organization Name, Country, State and Organization Unit
8. Click Create
Obtain the Certificate
1. After clicking create the following screen will appear
 2. Copy and paste the CSR information and provide it to your certificate vendor in order to get a certificate. This process will vary depending on your organization and the certificate company used to purchase certificates through.
Install the Certificate
1. Go To Traffic Management, expand SSL, click Certificates and then click Install
2. Browse to the Certificate File Name
3. Browse to the Private Key
4. Enter the password used to create the Private Key above
5. Click Install and the certificate will be added to the certificate list on the Netscaler
Apply the Certificate to your Virtual Servers
Read before proceeding: If any interruptions of services require a downtime in your organization do not proceed until a planned work window has been arranged
- Within the Netscaler go to Netscaler Gateway and then Virtual servers
2. Select the Virtual Server, right-click and choose Open
3. Select the new certificate and click “Add”
4. Select the old certificate and click “Remove”
5. Click OK
6. Click the save button in the upper right hand corner of to ensure your changes have been saved
7. Test and verify that the new certificate is functional
8. Remove the old expired certificates from Traffic Management, SSL
9. Choose remove toward the middle top of the screen
Note: It is ok to leave the old certificates until you are certain the new certificates are functional for everyone. A reason to leave this in place would be for an unexpected need to roll back to the old certificate before it expires.
10. Choose Save in the upper right hand corner of the screen to save the configuration
11. Test and verify that the new certificate is functional
This completes the process for adding/updating your 3rd party SSL certificate on a Netscaler with version 10.1 firmware.
Leave a Reply